MOROLITE GUIDE
MOROLITE®
Morolite® is a granulated conductive medium designed to replace the conventional aggregate in concrete and thereby provide a permanent medium with good electrical conductivity and high strength.
It can provide a permanent solution to problems in electrical/ constructional situations.
Morolite® concrete is touch dry within hours, but it will be several days before it is fully cured.
Morolite® is chemically inert with very low soluble sulphate content. It can be used with all conventional types of cement, as well as most

GRANULATED CONDUCTIVE AGGREGATE
Morolite® is the ideal solution for use in problem earth situations
a) In areas of poor soil conductivity (high resistivity) – eg rocky areas, sandy soil etc.
b) In conjunction with lattice mats/plates (where the earth electrodes cannot be deep driven)
c) Where space is limitedd
Depending on the surrounding soil conditions Morolite® can reduce electrode resistivity by up to 50%.
Electricity is conducted in much the same way as via metal, through the movement of electrons and direct contact with the carbonaceous particles that compose Morolite®.
This provides a huge advantage over materials such as Bentonite, that rely on conducting electricity through the movement of charged ions. Ions require the presence of an effective electrolyte –
water and salts. Such ion type systems can dry out and without water cannot conduct electricity.
Morolite® has a resistivity that is many times lower than that of Bentonite (Morolite 0.001Ωm vs Bentonite 3Ωm) in its natural setting or untamped condition.
Through acting as a backfill, (Morolite® is a highly conductive material), the surface area of the electrode is increased, thus reducing the electrodes’ resistance to earth.

THEFT DETERRENT
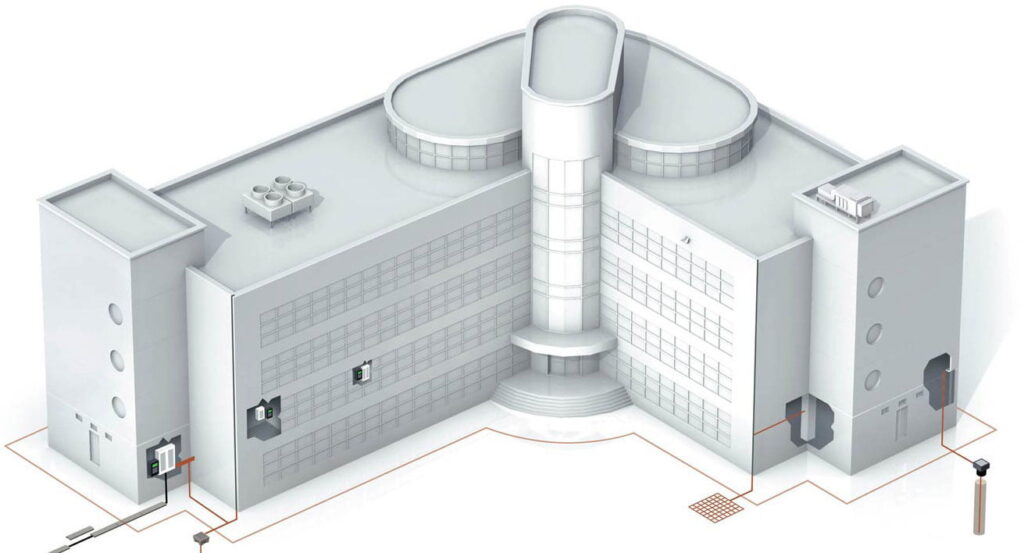
When copper conductors are encased in a Morolite®/concrete surround, this acts as a deterrent to those intent on stealing copper from cell sites and substations.
ADVANTAGES
Morolite® is a granulated conductive medium designed to replace the conventional aggregate in concrete and thereby provides a permanent medium with good electrical conductivity and strength.
- Low resistivity, especially when compared to Bentonite.
- Does not rely on moisture to conduct electricity.
- No seasonal variation – does not rely on water to conduct, does not shrink.
- Does not require maintenance.
- Chemically inert and non-polluting – non-corrosive to steel and copper, it does not attack cement structures. Its PH is within the neutral range.
- Environmentally safe – it does not dissolve or dissipate like other chemical enhancers such as caustic soda, salt and acid based products.
- Easy to use – forms a concrete like material that can be poured as a slurry and in some situations, used dry.
- Acts as a theft deterrent.
- High strength – can be used as part of the building structure and achieve strengths of grade 25 concrete.
- Synthetic material manufactured specifically for earthing applications.
MIXING INSTRUCTIONS
Plain Morolite®:
- 3:1 mix Morolite®/cement by weight plus 1 litre of water per 4kg. (ie 3 x 25kg bags of Morolite®, 1 x 25kg bag of cement, 6 litres of water.)
- It is possible to vary the ordinary portland cement and water content to suit local conditions, but this will affect the performance of the finished concrete.
Morolite® Premix:
- Cement and Morolite® have already been mixed, simply add 6 litres of water per 25kg bag of Morolite® Premix.
- When mixed as above, a relatively dry material is formed. Water content can be adjusted as the application requires, but this will affect drying times and resultant compressive strength. Typically, the mix is touch dry within hours but not fully cured until after several days.
Density:
- Pure dry Morolite® (Morolite-01) is approximately 1,000kg/m3 (40 x 25kg bag per one cubic metre)
- Dry Morolite®pre-mix (Morolite-02) is approximately 1,250kg/m3 (50 x 25kg bags per one cubic metre)
- The fully hardened density of Morolite® concrete, mixed as per instructions, is 1,500kg/m3
We recommend plain Morolite® for export markets.
APPLICATION
Earth Rod Installation
- Drill a hole 10 x the diameter of the earth rod (16mm diameter rod = 160mm diameter hole)
- Centre the earth rod in the hole and lower it to the bottom
- Mix Morolite® into a slurry and pour into the hole
- Tamp down the mix during pouring to exclude air pockets
- Keep the earth rod central to the hole
- Take a resistivity reading immediately after installation and again 14 days later

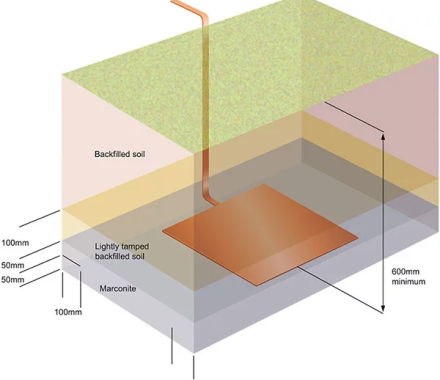
TRENCH INSTALLATION (PLATE/MAT)
- Excavate a trench to approximately 200mm larger, all round than the plate dimensions. The trench should typically be 1,000m deep (minimum 600mm)
- Mix the Morolite® into a slurry and pour into the trench to a depth of 50mm
- Connect the earth plate/mat to the connecting conductors
- Place the earth plate/mat on top of the first layer of Morolite® mix
- Cover the earth plate/mat with a second layer of Morolite® mix to a depth of 50mm
- Backfill the trench with native soil to a depth of 100mm and lightly tamp down
- Then backfill the trench according to the clients requirement
- The use of marker tape or tiles might be required
- Take a resistivity reading immediately after installation and again 14 days later

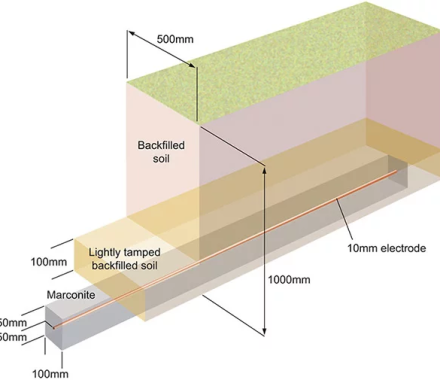
TRENCH INSTALLATION (CONDUCTOR)
- Excavate a trench, typically 1m deep and 0.5m wide. The length of the trench is determined by the resistivity of the native soil and the system requirement
- At the bottom of the trench excavate a small channel minimum dimensions 100mm wide and 100mm deep
- Mix the Morolite® into a slurry and pour into the channel to a depth of 50mm
- Lay the conductor on top of the first layer of Morolite® mix
- Cover the conductor with a second layer of Morolite® mix to a depth of 50mm
- Backfill the trench with native soil to a depth of 100mm and lightly tamp down
- Then backfill the trench according to the clients requirement
- The use of marker tape or tiles might be required
- Take a resistivity reading immediately after installation and again 14 days later

